Wednesday, September 10, 2008

Create and assign item to an Inventory Organization.

Following are the steps to create and assign an item to an inventory org:

1. Navigation : Resp-> Inventory->Items->Master Item


2. On the master item form, give the name a description of the new item. All the items that are created, are first created in master organization (Operating Unit) then it can be assigned to sub orgs.


3. Item creation requires a lot of details, so we can add those using template.
Goto Tools->Copy From . Select Purchased Item template, press 'Apply' and then 'Done'.


Save the changes.

4. Now on left side there is a button for organization assignment. Press that button.


You will get the list of available inventory orgs.


Query for the org to which you want to assign the item and check the Assigned check box. Save the changes.


Create an Inventory Organization in Oracle Applications

Today I tried this for one of my bugs.

The steps are as follows:
(All the below screen shots are of the inventory org that I already created. )

1. Resp Inventory-> Setup-> Organizations->Organizations.


Click on 'New'.

2. Enter the details as mentioned in the screen shot.


3. Click on 'Other' button.


4. Enter Account Information.


5. Enter Inventory Information.

Following are the screen shots of all the tabs of Organization Parameters window when you click on inventory information. (The tabs that are not shown don't contain any mandatory parameter).


Save all the changes. The set-up for new inventory is done.

6. Now you need to associate this new org to a responsibility.
Goto Resp Inventory-> Setup-> Organizations-> Organization Access


Assign responsibilities to this org. The new inventory is created.

Sunday, September 7, 2008

Convert pll to pld

Following are the steps to convert pll to pld:

A. Open oracle d2k forms tool
B. From menu File->Admisnitrative tool->Convert file
C. First option select pl/sql library
Second option select binary to text
Specify the pll file you want to convert and click ok
D. Check a pld is generated place where pll is located.

Happy learning !

Tuesday, September 2, 2008

Reversal of the receipt

Standard Reversal

When a receipt is reversed using standard reversal, receivables opens all the debit and credit items that were closed with the receipt and creates reversal journal entires for your GL. If the transactions applied to the receipt are related to the chargebacks which are posted to GL or have activities against them (chargebacks), then you must create a debit memo reversal.

If you create a standard reversal for a receipt that you have applied, then Receivables reverses any adjustments or chargebacks that you created, as long as you have not posted these adjustments to your GL.

For a standard reversal, a row for reversed status is inserted in AR_CASH_RECEIPTS_HISTORY_ALL. 'APP' and 'UNAPP' rows are inserted in AR_RECEIVABLE_APPLICATIONS_ALL cancel out the 'APP' and 'UNAPP' entries which were inserted when the transactions were applied to the receipt.

Debit Memo Reversals

A debit memo reversal of the receipt is different from the normal reversal in a way that it doesn't update any of the receipt activity. Instead it opens a debit item item equal to the amount of the net of the closed debit and credit transactions indicating a balance against the customer. As a result, the reversed receipt shows the transaction as still applied.

You must create a debit memo reversal if:
• you are reversing a receipt from which you have created a chargeback and this chargeback has had activity against it (for example, another receipt, credit memo, or
adjustment), or
• you are reversing a receipt with a remitted credit card refund application.
• you are reversing a receipt (Receipt A) that was applied to another receipt (Receipt B), if the reversal would draw Receipt B’s balance negative.

You cannot create a debit memo reversal for a miscellaneous (non-invoice related) receipt.

If the receipt that you are reversing uses a payment method with the Debit Memo Inherit Receipt Number option set to Yes, then receivables assigns the same transaction number as the receipt number to the debit item. The transaction type of the debit item is 'Debit Memo Reversal'.

The receipt data is not changed. There is no link created between the receipt and the debit item. You can query using the debit memo specifics.

On the receipt window when you press 'Reverse' the receipt reveral window pops up. In 11i it looks like this:


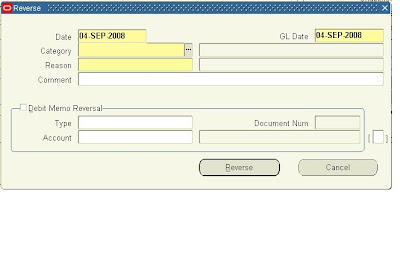
Reference : 11.5.10 AR user guide.

Cannot read value for profile option FND_DEVELOPER_MODE

What should be done when you get this error:

Cannot read value for profile option FND_DEVELOPER_MODE in routine &ROUTINE.

Cause
Incorrect setup

Solution
Set FND:Developer Mode to No.

References: Metalink Note 563884.1

Thanks !

Monday, September 1, 2008

How to raise an error message in Oracle Applications

fnd_message.Set_Name('', '');
fnd_message.error;
RAISE FORM_TRIGGER_FAILURE;